PURPOSE
In Fusion HCM, Public Holidays are defined as Calendar Events which are linked to a country or locations via a Geography Tree. A global Work Schedule is then defined with the Public Holidays specified as Exceptions.
This document illustrates how to set up a Geography Tree, and a Calendar Event for use in HCM Work Schedules.
This document illustrates how to set up a Geography Tree, and a Calendar Event for use in HCM Work Schedules.
SCOPE
The document is part of a series of high level articles with the intention of explaining how to set up work schedules with a view to monitoring worker availability in Fusion HCM.
DETAILS
1. Define Geographic Regions
To create Geographic Regions use lookup type “ORA_PER_GEOGRAPHIC_TREE_NODES”
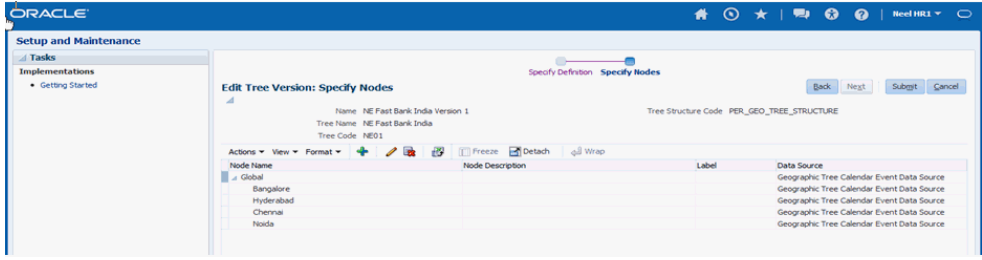
Navigate to Manage Common Lookups   It should be noted that the values entered in the lookup code should NOT be the same as the country abbreviations, such as DE, US, IN etc. 2. Define Geography Tree Navigate to Manage Geography Trees       Enter the details and click Next    Change the Data Source to “Geographic Tree Calendar Event Data Source” And this will show all the locations created under lookup “ORA_PER_GEOGRAPHIC_TREE_NODES” Select Global and add to the nodes  Select Global and Click on Add   Click Submit 
The following message will be displayed:
Tree version NE Fast Bank India Version 1 for tree NE01 created successfully
and the Specify Nodes page should now look like this.
 Row Flatten Tree Version From Search Results screen, select the Tree Version row and do Actions -> Flatten -> Row Flattening. This is a technique to make the retrieval of the tree faster.   Click on Online Flattening  Click Done. Do Online Audit From Search Results screen, select the Tree Version row, and do Actions ->Audit. Click on Online Audit button from Tree Audit Result page.   Click on Online Audit   Click Done Activate Tree Version Finally from Search Results screen, select the Tree Version row and do Actions -> Set Status -> Active  Click Active  The following message will be displayed: 'Status of tree version NE FAST Bank India Version 1 changed to ACTIVE' 3. Create Calendar Event Public Holidays now need to be created for each of the countries, and attached to the respective node in the Geography Tree. Using Manage Calendar Events task, click on Create Icon, and enter Name, Category, Date, and Short Name of the Public Holiday. Then under Coverage, choose the Hierarchy Type of Geographic, and the Hierarchy previously created. Expand the Global Node, click on the Locations to whom the Public Holiday is associated, and click on the Include Icon.  Select Hierarchy Type as Geographic and Hierarchy as NE Fast Bank India. Select the regions for which the public holiday is applicable  4. Add Calendar Event to the Work Schedule Once Public Holidays have been entered as Calendar Events for all the regions, an exception can be added to the global Work Schedule so that they are regarded as Off Period, and workers in that region will be Unavailable for work on that day.  Click Submit. 5. Assign Geographic Hierarchy to the location Navigate to Manage Locations à select your location and change the Geographic Hierarchy  |
No comments:
Post a Comment