Displaying Worker Profile Photos in Oracle Fusion OTBI Reports
In Oracle Cloud HCM, standard Oracle Transactional Business Intelligence (OTBI) reports typically display tabular alphanumeric details such as Person Number, Display Name, Job, and Department. However, business stakeholders frequently request visual rosters, headcounts, or executive directory dashboards that include worker profile images.
While OTBI subject areas do not expose person photo BLOB objects directly as reportable columns, we can dynamically render worker photos inline by leveraging Oracle Fusion’s internal image servlet path combined with OTBI’s Treat Text as HTML data formatting. In this technical walkthrough, we configure an end-to-end report in Workforce Management - Person Real Time to surface worker images seamlessly.
📌 Technical Architecture Profile
Step 1: Create Analysis & Select Columns
Begin by creating a standard OTBI analysis using the Person Real Time subject area.
Navigation: Tools > Reports and Analytics > Browse Catalog > New > Analysis
- Select Subject Area: Workforce Management - Person Real Time.
- From the Worker folder, add the baseline identifying attributes:
Person NumberPerson ID(required for the image servlet hook)Name
- Add an additional dummy column or duplicate
Person IDto convert into the image display column.
Step 2: Construct the HTML Image Servlet Formula
Oracle Fusion HCM serves worker profile pictures via an authenticated lightweight endpoint located at /hcmUI/personImage?personId=<value>. By concatenating this relative URL into an HTML <img> tag and casting the numeric Person ID to a character type, the report dynamically requests each worker's image at runtime.
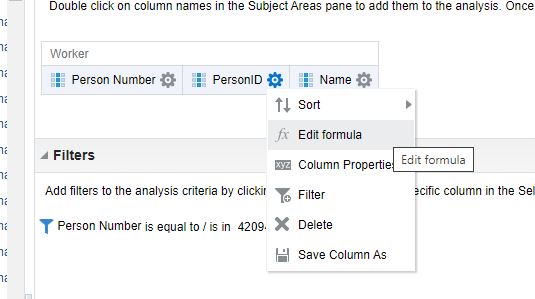
- Click the Settings (gear icon) on the column designated for worker photos and select Edit Formula.
- Rename the Column Heading to
Person Image. - Enter either of the following formula expressions in the Column Formula editor:
Optional: If you wish to enforce consistent sizing directly within the HTML markup, specify height and width attributes:

Step 3: Enable 'Treat Text as HTML' in Column Properties
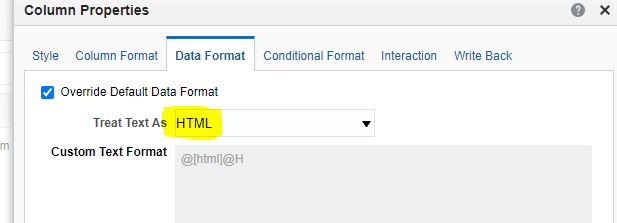
By default, OTBI escapes markup characters to prevent cross-site script injection, rendering the formula string literally (e.g., displaying the raw <img ...> string). To execute and render the image tag, you must update the column data format:
- Click the Settings (gear icon) on the
Person Imagecolumn and select Column Properties. - Navigate to the Data Format tab.
- Select the checkbox Override Default Data Format.
- Under the Treat Text as dropdown, select HTML.
- Click OK to confirm.

Step 4: Reviewing Results in Table View
Navigate to the Results tab. The browser resolves the relative servlet URI for each row, loading and displaying the corresponding employee photo directly beside their demographic details.

Architectural Considerations & Key Limitations
- Export Limitations (Excel & PDF): When exporting this report to Microsoft Excel or PDF, the image will not embed as a graphic object. Because OTBI does not fetch and serialize the binary image during spreadsheet rendering, Excel will display either blank cells or raw HTML markup. This technique is intended primarily for interactive online dashboards and catalog table views.
-
Relative URI vs. Absolute URLs: Using the relative path
/hcmUI/personImage?personId=...ensures that your report remains fully portable across environments (DEV, TEST, and PROD pods) without hardcoding server hostnames or requiring modification post-migration. - Session Authentication: The image endpoint requires an active Fusion session. If an unauthorized user attempts to query the direct image URL, the servlet returns a redirect to the identity provider (SSO) login.
- Fallback Behavior: If an employee has not uploaded a profile picture, Oracle Fusion’s servlet automatically renders a default placeholder avatar silhouette.
🔑 Key Implementation Summary
- Endpoint: Concatenate
'/hcmUI/personImage?personId=' || CAST("Worker"."Person ID" AS char) || '">'. - Rendering Mode: Set Column Properties > Data Format > Treat Text as HTML.
- Best Fit: Use for interactive HR dashboards, manager portals, and directory queries where visual identification enhances user experience.

No comments:
Post a Comment