Sunday, 21 January 2018

what is the difference between tables fnd_user_resp_groups and fnd_user_resp_groups_direct ?

All the active assignments of responsibilities can be extracted by using the FND_USER_RESP_GROUPS table which combines DIRECT and INDIRECT responsibilities.
FND_USER_RESP_GROUPS_ALL lists all users and against all responsibilities they ever had even if they no longer have them.
FND_USER_RESP_GROUPS lists only the users who have current, active responsibilities
If you need only the DIRECT responsibilities than you also have the option to use the seeded view FND_USER_RESP_GROUPS_DIRECT.
If you need only the INDIRECT responsibilities (added by roles - like Application Diagnostics) then use the seeded view FND_USER_RESP_GROUPS_INDIRECT.

Source : Oracle Forums

When you tag responsibility from sysadmin then it is visible in FND_USER_RESP_GROUPS_DIRECT view.

When you create a role,in which there are multiple responsibilities present and the role is then tagged to user then those responsibilties will be visible in FND_USER_RESP_GROUPS_INDIRECT
http://www.erpschools.com/sysadmin-and-aol/user-management-role-categories-roles-indirect-responsibilities

Thursday, 11 January 2018

Global Self Service Functions Custom and Manager Actions Menu

To include a new cutom SSHR menu option, use the following instructions.

1. Create the Custom Workflow as per the business process. Create a form function (copy a seeded ESS function) for ESS process. Make the following changes to the definition
a. Change parameter pProcessName so that it refers to the desire workflow process
b. Change parameter pCalledFrom so that it includes the internal name of the function being created
c. Change the value passed to OAFunc (HTML Call) to include the internal name of the function being created

2. Create a Form function for MSS based on any seeded MSS function. Change the value of the parameter pCalledFrom so that it refers to the internal name of the ESS function

3. Include the newly created ESS and MSS form functions in "Global Self Service Functions Custom" menu

4. Include the newly created ESS function in "Manager Actions Menu"

5. If the process is required in the ESS menu Include the newly created ESS form function in the Employee Self Service Menu

6. If the process is required in the MSS menu Include the newly created MSS form function in the Employee Self Service Menu

Please note that these steps are only relevant for SSHR. They may not work for other modules.

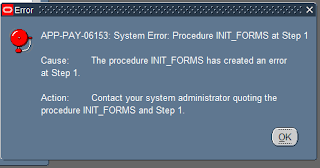
APP-PAY-06153:System Error. Procedure INIT_FORMS at Step 1

The above error is encountered when we try to open a form without assigning the HR: Security Profile profile option to the responsibility.

Tuesday, 9 January 2018

Balance Initialization

Balance Initialization
------------------------------
Balance initialization is used primarily to set up balances from legacy systems in case of mid year payroll implementations. If a payroll is implemented at the beginning of a tax year, it may not require initial balances. However, if a payroll is implemented in the middle of a tax year, balance initialization is important to ensure accurate calculations and payroll reporting.

Define your Element with Primary Classification = ‘Balance Initialization’

1)      Must be `Adjustment Only'
2)      Must be a non recurring type
3)      Must be processable in a payroll run
4)      Must be ‘Last Standard Process

Should default to these when ‘Balance Initialization’ is chosen

Now create Input Values

1)      Must have a start date 01-JAN-0001
2)      Each input value must feed only one balance
              If you need to set initial values for a large number of balances you can define
              Multiple input values for a single element with each input value feeding
              different balance.

Now Define an Element Link

1)      Must have a start date 01-JAN-0001
2)      Criteria must be only Link To All Payrolls - 'Yes'

Now use your Element as an Initial Feed for the Balance you wish to upload

Navigate
Total Compensation -> Basic -> Balance

Query up the Balance you want to upload initial values for

Click on Initial Feed

Under Element Name select your Initialization Element from the list of Values

Select the Input value

Save

Now Navigate back to your Balance Initialization Element

Click on Balance Feeds and you will see that this Element will feed your balance. The Initial Upload Process with create the necessary run result for this Element to populate your balance with its Initial Balance value

Costing related information Oracle Payroll

Different types are
1) Costed
2) Fix Costed
3) Distributed

1) Costed
---------------
When an element link is costed, then all five levels of costing are considered. It is important to note that this type allows you to use assignment level costing. This means you can split the run result values over more than one set of cost codes. This is done on the Assignment costing screen, you are able to enter percentages for specific sets of segments, the sum of these must be 100 percent.

2) Fix Costed
--------------------
Fix costed doesnt use assignment level and organization level costing.

3) Distributed
-------------------
A Distribution Set of elements is created(Element Set). Then this distribution set is linked at element link level.The element is then costed as a member of the distribution set, so the costing result is divided by the sum of the distribution set costings and multiplied by the number of members in the set.


Snippets from Oracle Help Page:
Select the Costable Type. The default is Not Costed, meaning that the system maintains no costing information for the element.
  • To allow entry of costing information at all levels, including the assignment and element entry levels, select Costed This is the appropriate selection for most elements representing earnings types.
  • If you do not need to cost the element at organization and assignment levels, select Fixed Costed. This is appropriate for some deductions, which are irrelevant to labor distribution analyses.
  • If you want to distribute overhead costs (such as employer contributions to a pension plan) over other elements, select Distributed.Then select a Distribution Set.
Note: Some element classifications for your legislation may be predefined as Not Costed and you cannot override this.

Sunday, 7 January 2018

Checklists and Approvals

Use AME for approvals of checklists.
Transaction Type - Checklist
approvals attribute - CHECKLIST_ATTRIBBUTE

In Checklist task definition add Approvals Identifier.
You can use Oracle Approvals Management (AME) to generate a list of performers for the task. To activate AME, you select a value in the Approvals Identifier field of the Checklist Tasks page. The application retrieves the values available for selection from the values you have defined in AME and used in the AME conditions. You can create approval rules based on the task and person's details such as business group, organization name, job, position, or supervisor name.


1)     Create PQH roles(update: When PQH roles were added to approver groups then approvals were not sent)
2)      Create approver groups in AME under Checklist Transaction types
3)      Create conditions using CHECKLIST_TYPE attribute
4)      The above value is passed from Checklist’s task definition from Approval Identifier

5)      Create rules

Make sure that the user has an employee attached or else the task will not be triggered.