Wednesday 12 December 2018

How do you create an Assignment Set based on a Descriptive FlexField?

The following steps can be utilized to Create an Assignment Set Based on a Descriptive FlexField:
  1. Create a Database Item for the Descriptive FlexField that Assignment Set Criteria will be based on
  2. Run the concurrent program 'Create Descriptive Flexfield DB Items' from the HRMS responsibility
  3. Database items will be created and the same can be accessed when defining the Assignment Set Criteria
  4. Go to Assignment Set and give the Assignment set name.
  5. Enter the criteria by clicking the button 'Criteria'.
  6. Define the criteria using for your requirement
  7. This is where the previously created Database Item can be accessed
  8. Save the formula
  9. When the fast formula is save it will have the same name as Assignment Set name.
  10. 'Generate' the formula
The fast formula can be changed accordingly with your logic.

Source:1373798.1

Tuesday 17 July 2018

Applications SSO Login Types

Applications SSO Login Types

If your site has implemented single sign-on with Oracle Internet Directory (OID), this profile option determines how users can log in to Oracle Applications.

  • SSO - User passwords are maintained only in OID. Users must log in to Oracle Applications through single sign-on.
  • Local - User passwords are maintained only in Oracle Application Object Library. Users must log in through the local Oracle Applications login page.
  • Both - User passwords are maintained both in OID and in Oracle Application Object Library. Users can log in to Oracle Applications either through single sign-on or through the local Oracle Applications login page. A user's single sign-on password can be different than that user's Oracle Application Object Library password.

Password of the user can be changed if this profile option is set to Both.

Thursday 21 June 2018

Choosing recurring or non recurring element for absence element setup

You can associate each absence type with a recurring or nonrecurring absence element. Each element has an input value with either hours or days as its unit of measure.

Using a Nonrecurring Element

Nonrecurring element entries are valid for one payroll period. When you enter an absence of a type associated with a nonrecurring element, the application creates an element entry for the period in which the absence start date falls. For example, if you enter an absence that starts on 4 May for someone on a monthly payroll, the entry is dated 01 May to 31 May.
The entry is only created when you enter the absence end date, and you must enter the absence duration at the same time. The duration can be defaulted if you set up an absence duration formula. The full value of the absence duration is recorded in the absence element entry, even if the end date falls outside of the payroll period.

Using a Recurring Element

Attention: This option is only available if you use Oracle Payroll and the Proration functionality is enabled in your localization.
UK Users: If you use the Statutory Absence Payments feature you must continue to use nonrecurring elements to record long term sick leave.
Use this approach if you want to begin processing absences before end dates are recorded. You do not enter absence duration on the recurring element entry. Instead, you use a payroll formula to calculate the absence duration to be processed in each payroll period. Use the absence duration formula to calculate the duration displayed on the Absence Detail window. This value is deducted from the current PTO accrual when you enter an end date for an absence type that is associated with a PTO accrual plan.
Recurring element entries start on the absence start date and end on the absence end date (if there is an end date). If the absence ends in the middle of a payroll period, the payroll run detects and processes the absence using the proration functionality.

Monday 11 June 2018

How to setup PDF Online Payslip in R12.1.3

You enter self-service preference information to define whether documents such as the online payslip is available in an online and/or paper version.
Note: You can also enter this information at the Person or Location level.

These information levels are arranged in a hierarchy; if you define self-service preferences at the person level,
the settings will override any other settings made at the location, business group, or HR organization level.
Similarly, if you define self-service preferences at the location level, the settings override any settings at the business group or HR organization level.
Settings at the HR organization level will override settings at the business group level.


To enter Self-Service Preference information:

1. In the Organization window, query the Business Group or HR Organization if it does not already appear there.

2. In the Organization Classifications region, select Business Group or HR Organization, choose Others, and select Self Service Preference.

3. Click in a field of the Additional Organization Information window to open the Self Service Preference window.

4. Select the document type for which you want to define preferences.

5. Select whether you want the document to be available online: Payslip

6. Select whether you want the document to be available on paper.

7. For online payslips if you are providing payslips in PDF format, specify:
• The payslip template you wish to use.
• If you wish to append custom data to the generated XML, specify the custom package/procedure in the XML Code field as follows: ..
• The date these changes are to take effect.
Note: Template, XML Code and Effective Date fields in Self-Service Preference can be configured at the Business Group, HR Organization and Location levels.
The application generates either an Oracle Applications Framework (OAF)-based payslip or PDF payslip depending on the values entered in the Template and Effective Date fields:
• If both the fields are left blank, the application generates an OAF payslip.
• If you select a template and enter an effective date later than payment date, the application generates an OAF payslip.
• If you select the template and enter an effective date earlier than or equal to payment date, the application generates a PDF payslip.
• If you do not select a template and enter any date within the Effective Date, the generates an OAF payslip.
• If you select the template but do not enter an effective date, the application generates a PDF payslip.

8. Payslip Employer Address – Select either GRE/Legal Entity Address or HR Organization Address (default) for display on the payslip.
Note: You can configure this segment only at Business Group level.

9. Display Payslip GRE Addr From – If you selected GRE/Legal Entity Address for the Payslip Employer Address field, select the effective date after which the GRE address displays on the payslip.
Note: You can configure this segment only at Business Group level.

10. Specify the Offset Criteria – Select either Payslip View Date or Date Paid to configure the date to be used for displaying Online Payslips..
If this field is left blank or Payslip View Date is selected then the online payslip will be displayed based on the Payslip View Date defined for the payroll period.
If Date Paid is selected then the payslip will be displayed based on the Date Paid of the payroll run.
Note: By default, Payslip View Date – Check Date for any period will be equal to the Payslip offset defined for the payroll.
However, if the user manually changes these dates for any period, then the Payslip Offset for that period will be considered as the Payslip View Date – Check Date and not the Offset defined for the Payroll.
Further, if the Payslip View Date and/or the Payslip Offset is set to null, then all payslips (prior, current and future) will be available to the employee.
(By default, the Payslip Offset is set to zero when creating the Payroll definition.)

11. Save your work.

Source: Oracle Support Doc Id : 2059263.1,2322282.1
Wednesday 30 May 2018

Query to get the package called from webadi

select ba.attribute2
, bit.user_name
from apps.bne_attributes ba,
apps.bne_param_lists_b bplb,
apps.bne_interfaces_b bib,
apps.bne_integrators_tl bit
where bib.upload_param_list_code = bplb.param_list_code
and bib.integrator_code = bit.integrator_code
and ba.attribute_code = bplb.attribute_code
and bit.language='US'
and bit.user_name = '----';

Thursday 5 April 2018

FND_GLOBAL.APPS_INITIALIZE

Use below code to set the session.

fnd_global.APPS_INITIALIZE(user_id=>l_user_id,
                                                   resp_id=>l_resp_id,
                                                resp_appl_id=>l_resp_appl_id);
  1. l_user_id is the fnd user ID which will be utilized during the call.
  2. l_resp_id is the responsibility ID
  3. l_resp_appl_id is the responsibility application ID.


Query to get the values.

select fnd.user_id , 
       fresp.responsibility_id, 
       fresp.application_id 
from   fnd_user fnd 
,      fnd_responsibility_tl fresp 
where  fnd.user_name = 'SYSADMIN' 
and    fresp.responsibility_name = 'RESP_NAME';

Wednesday 21 March 2018

R12: New Functionality Support Quick Reference: Payroll: Costing of Payments (Doc ID 401978.1)

Brief Description:
Costing of Payments provides a facility to automatically post accounting journals to Financials when a payment is raised.

Navigation Path:  Submit concurrent process – Costing of payments

Development Area: Core Payroll (506)

Delivery Method: Oracle Applications Release 12

Modules Affected: Core Payroll

Objects Affected
PAY_ORG_PAYMENT_METHODS_F
PAY_PAYMENT_GL_ACCOUNTS_F
PAY_PAYMENT_COSTS

Log Bugs Under Core Payroll

Diagnostics Available Payroll log file LOGGING

Configurations Issues: None Reported

Workarounds Available if Feature Fails None Available
Known Issues:
  • Ensure the costing options are correctly configured in the Organization Payment Method form.
  • Review whether the external/manual payments need to be excluded or not.
  • Review whether void payments should be costed before or after the payroll reconcilliation

Monday 5 February 2018

Is there a way to make any Self Service Responsibility Read Only in SSHR?

This functionality is not available in OAF pages.  You need to use personalizations at responsibility level to disable update, create and hyperlinks.

Only forms can use HR: Read Only Profile option or modify function parameters.

Sunday 21 January 2018

what is the difference between tables fnd_user_resp_groups and fnd_user_resp_groups_direct ?

All the active assignments of responsibilities can be extracted by using the FND_USER_RESP_GROUPS table which combines DIRECT and INDIRECT responsibilities.
FND_USER_RESP_GROUPS_ALL lists all users and against all responsibilities they ever had even if they no longer have them.
FND_USER_RESP_GROUPS lists only the users who have current, active responsibilities
If you need only the DIRECT responsibilities than you also have the option to use the seeded view FND_USER_RESP_GROUPS_DIRECT.
If you need only the INDIRECT responsibilities (added by roles - like Application Diagnostics) then use the seeded view FND_USER_RESP_GROUPS_INDIRECT.

Source : Oracle Forums

When you tag responsibility from sysadmin then it is visible in FND_USER_RESP_GROUPS_DIRECT view.

When you create a role,in which there are multiple responsibilities present and the role is then tagged to user then those responsibilties will be visible in FND_USER_RESP_GROUPS_INDIRECT

http://www.erpschools.com/sysadmin-and-aol/user-management-role-categories-roles-indirect-responsibilities

Thursday 11 January 2018

Global Self Service Functions Custom and Manager Actions Menu

To include a new cutom SSHR menu option, use the following instructions.

1. Create the Custom Workflow as per the business process. Create a form function (copy a seeded ESS function) for ESS process. Make the following changes to the definition
a. Change parameter pProcessName so that it refers to the desire workflow process
b. Change parameter pCalledFrom so that it includes the internal name of the function being created
c. Change the value passed to OAFunc (HTML Call) to include the internal name of the function being created

2. Create a Form function for MSS based on any seeded MSS function. Change the value of the parameter pCalledFrom so that it refers to the internal name of the ESS function

3. Include the newly created ESS and MSS form functions in "Global Self Service Functions Custom" menu

4. Include the newly created ESS function in "Manager Actions Menu"

5. If the process is required in the ESS menu Include the newly created ESS form function in the Employee Self Service Menu

6. If the process is required in the MSS menu Include the newly created MSS form function in the Employee Self Service Menu

Please note that these steps are only relevant for SSHR. They may not work for other modules.

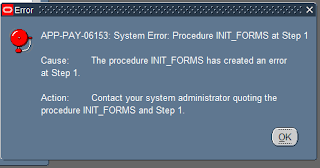
APP-PAY-06153:System Error. Procedure INIT_FORMS at Step 1

The above error is encountered when we try to open a form without assigning the HR: Security Profile profile option to the responsibility.

Tuesday 9 January 2018

Balance Initialization

Balance Initialization
------------------------------
Balance initialization is used primarily to set up balances from legacy systems in case of mid year payroll implementations. If a payroll is implemented at the beginning of a tax year, it may not require initial balances. However, if a payroll is implemented in the middle of a tax year, balance initialization is important to ensure accurate calculations and payroll reporting.

Define your Element with Primary Classification = ‘Balance Initialization’

1)      Must be `Adjustment Only'
2)      Must be a non recurring type
3)      Must be processable in a payroll run
4)      Must be ‘Last Standard Process

Should default to these when ‘Balance Initialization’ is chosen

Now create Input Values

1)      Must have a start date 01-JAN-0001
2)      Each input value must feed only one balance
              If you need to set initial values for a large number of balances you can define
              Multiple input values for a single element with each input value feeding
              different balance.

Now Define an Element Link

1)      Must have a start date 01-JAN-0001
2)      Criteria must be only Link To All Payrolls - 'Yes'

Now use your Element as an Initial Feed for the Balance you wish to upload

Navigate
Total Compensation -> Basic -> Balance

Query up the Balance you want to upload initial values for

Click on Initial Feed

Under Element Name select your Initialization Element from the list of Values

Select the Input value

Save

Now Navigate back to your Balance Initialization Element

Click on Balance Feeds and you will see that this Element will feed your balance. The Initial Upload Process with create the necessary run result for this Element to populate your balance with its Initial Balance value

Costing related information Oracle Payroll

Different types are
1) Costed
2) Fix Costed
3) Distributed

1) Costed
---------------
When an element link is costed, then all five levels of costing are considered. It is important to note that this type allows you to use assignment level costing. This means you can split the run result values over more than one set of cost codes. This is done on the Assignment costing screen, you are able to enter percentages for specific sets of segments, the sum of these must be 100 percent.

2) Fix Costed
--------------------
Fix costed doesnt use assignment level and organization level costing.

3) Distributed
-------------------
A Distribution Set of elements is created(Element Set). Then this distribution set is linked at element link level.The element is then costed as a member of the distribution set, so the costing result is divided by the sum of the distribution set costings and multiplied by the number of members in the set.


Snippets from Oracle Help Page:
Select the Costable Type. The default is Not Costed, meaning that the system maintains no costing information for the element.
  • To allow entry of costing information at all levels, including the assignment and element entry levels, select Costed This is the appropriate selection for most elements representing earnings types.
  • If you do not need to cost the element at organization and assignment levels, select Fixed Costed. This is appropriate for some deductions, which are irrelevant to labor distribution analyses.
  • If you want to distribute overhead costs (such as employer contributions to a pension plan) over other elements, select Distributed.Then select a Distribution Set.
Note: Some element classifications for your legislation may be predefined as Not Costed and you cannot override this.

Sunday 7 January 2018

Checklists and Approvals

Use AME for approvals of checklists.
Transaction Type - Checklist
approvals attribute - CHECKLIST_ATTRIBBUTE

In Checklist task definition add Approvals Identifier.
You can use Oracle Approvals Management (AME) to generate a list of performers for the task. To activate AME, you select a value in the Approvals Identifier field of the Checklist Tasks page. The application retrieves the values available for selection from the values you have defined in AME and used in the AME conditions. You can create approval rules based on the task and person's details such as business group, organization name, job, position, or supervisor name.


1)     Create PQH roles(update: When PQH roles were added to approver groups then approvals were not sent)
2)      Create approver groups in AME under Checklist Transaction types
3)      Create conditions using CHECKLIST_TYPE attribute
4)      The above value is passed from Checklist’s task definition from Approval Identifier

5)      Create rules

Make sure that the user has an employee attached or else the task will not be triggered.